
Roof Inspections
Roof Inspection for Columbus OH
Purchasing a home is the single biggest financial investment most people will make in their lifetime. Before you make such a significant commitment, it is vital that you receive a thorough and professional home inspection that includes a roof inspection. A bad roof can allow moisture to seep into the home and cause significant damage that isn’t obvious to the naked eye. Replacing an old roof can cost thousands of dollars and that amount can increase exponentially if the roof is covering hidden problems. This is exactly why Home Inspections LLC, specializes in providing Columbus, Ohio residents with the absolute best in home and roof inspections. When you work with our team of knowledgeable and experienced experts, you can enter into the home buying process with a clear picture of the condition of home and the cost of any necessary repairs.
Important Questions to Ask During Your Roof Inspection
While this might sound silly, the first question you want to ask a potential home inspector is whether they actually get on the roof in order to assess the condition of the roof. You might be surprised to learn that many home inspectors will simply perch a ladder on the eaves and use binoculars to get a closer look at your roof. This method inherently limits what an inspector can see and puts you at risk of purchasing a home with significant roofing problems that will require costly repairs.
If you encounter an inspector that assures you that it isn’t necessary to actually get on the roof in order to conduct a thorough inspection, you need to give us a call. It is simply a fact that a qualified home inspector cannot properly assess damage with binoculars. This is an unacceptable practice, which makes it especially important to ask what standards of practice your inspector follows. Be sure to work with a certified inspector who conducts inspections by actually getting on the roof according to the recommendations and standards set forth by The American Society of Home Inspectors.
At Home Inspections LLC, our experts have years of experience working in both the commercial and residential construction industry in and around Columbus. This experience means that we are well versed in construction best practices and have unique insights into how a well-built roof should look and operate. Our experts are also licensed adjusters, which means that they have spent time on countless rooftops. Home Inspections LLC will physically get on any roof that is less than 18 feet high and has a 10/12 pitch or less. Typically, this includes almost 100% of all residential properties.
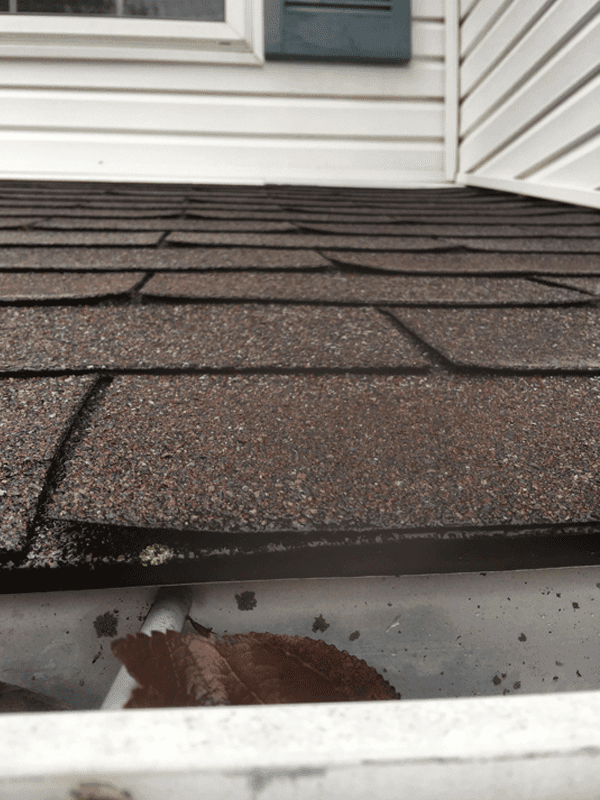
An example of aging shingles found during a roof inspection in Columbus OH
What Are the Signs of Aging in Shingles
The shingles that protect your roof and keep your house dry will naturally deteriorate over time, which makes it important to learn how to recognize the signs of aging in your shingles. Fortunately, all fabricated shingles tend to display the same symptoms as the years take their toll. This means that with the right information, you can learn to identify important indications of aging no matter what kind of roof you have. Keeping a look out for these signs can tell you when it is time to consider getting a new roof.
One important fact to remember is that not all shingles age at the same pace. Different shingles have different life spans and the best way to assess how long your shingles will last is to check the manufacturer’s warranty. You should also work with your roofing specialist to determine the best installation method in order to prolong your roof’s lifespan.
For example, if your roof came with a warranty that lasts fifteen years, you may want to begin checking for serious wear and tear prior to the manufacturer warranty expiration. However, to truly keep your roof in prime condition, you should have your roof properly inspected by a qualified roofer at least twice a year. Being diligent about inspections and taking preventative measures can not only prolong the life of your roof, but also identify any problems before they have the chance to cause significant damage.
Some of the first signs that a shingle has become old and may need replacing is when it begins to crack, curl and become loose. At this stage, shingles may even break free from the roof. If you are noticing any of these signs, it is important that you don’t ignore them and take action as soon as possible. Begin by contacting a qualified roofing contractor or home inspector in order to have the roof assessed.
As shingles age, they also tend to lose their ability to retain the granules that create a gritty surface. This happens as a natural result of the hardening of the shingle and the weather and elements start loosening the granules. Wind and rain can push the granules down the slope of your roof causing them to either fill your gutters or fall onto the ground around your home.
While shingle granules will almost always end up in your gutters or on the ground around your home, a few missing patches of granules does not signal that the shingles need to be replaced immediately. When the amount of missing granules seems significant, then it is time for a closer look at the shingles themselves. Again, this is when you should schedule an appointment with a qualified roofing contractor and have them provide you with an assessment of your roof. This is especially true if you are experiencing any leaks or have recently noticed stains on the ceilings around your home.
Severe weather, such as hail and high winds, can also cause relatively new shingles to crack and break. Storms can speed up the aging process for shingles and cause more extensive damage to older shingles. This is why even newer roofs need to be inspected at least twice a year to assure that it has not lost its integrity.
First and foremost, it is vital that you work with an experienced and qualified roofing contractor to handle your roofing needs. Whether you need to replace or repair aging or damaged shingles, the right home inspector will be able to provide quality services that will protect the integrity of your roof and prevent major problems. By having your roofing contractor repair individual shingles as they become damaged, you will protect your investment, extend the life of your roof and enjoy peace of mind.
What are Other Common Problems Inspectors Look for
In addition to signs that your roof’s shingles are aging and not capable of properly diverting water away from your home, inspectors will also look for signs that your roof has been properly installed. Plumbing pipes, chimneys and other intersections can create seams and gaps that allow water to penetrate your roof. If a professional installed your roof, all of these areas should be properly protected using a variety of installation best practices; however, not all roofers are created equal and mistakes can happen.
Fortunately, our skilled and licensed home inspectors are well educated in roofing installation and construction techniques, which means that they can quickly identify any potential problems before they become major headaches. Keep reading to learn more about the different aspects of a well-built roof and areas that may need to be addressed.
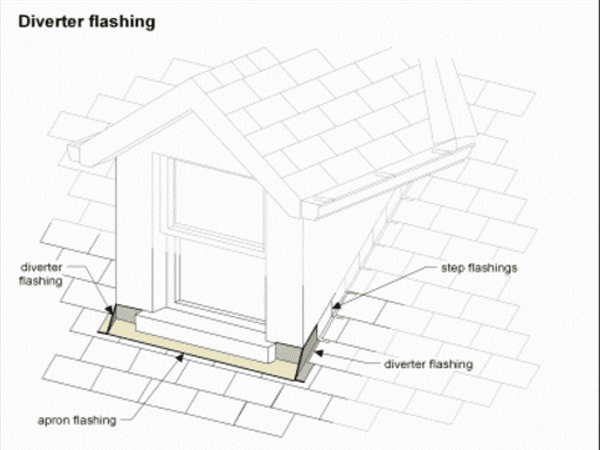
Kick out Flashing
It is important to remember that a roof is much more than just shingles. There are other important components involved in roof construction that help to prevent water damage and protect your home. Kick out flashing, also known as diverter flashing, is a key part of any well-constructed roof. This special type of flashing diverts rainwater away from the siding and into the gutter. When installed properly, this flashing provides superior protection that prevents water from penetrating into the building envelope.
Several factors can lead to rainwater intrusion, but missing kick out flashing, is perhaps the most destructive source of water damage. If the kick out flashing is missing or has been improperly installed, the result is concentrated areas of water accumulation that have the potential to cause severe damage to exterior walls.
Home Inspections LLC experts have a unique combination of construction and inspection experience that allow us to evaluate your roof and identify any problems. The first noticeable sign of problems with the kick out flashings will appear in the form of vertical water stains on the siding or exterior of the home. While this is an obvious concern, inspectors should not rely solely on visual cues. By the time water stains begin to appear, significant damage may have already occurred. That is why we will make sure the kick outs are installed exactly where they need to be and correctly positioned to safely and effectively divert water away from the roof.

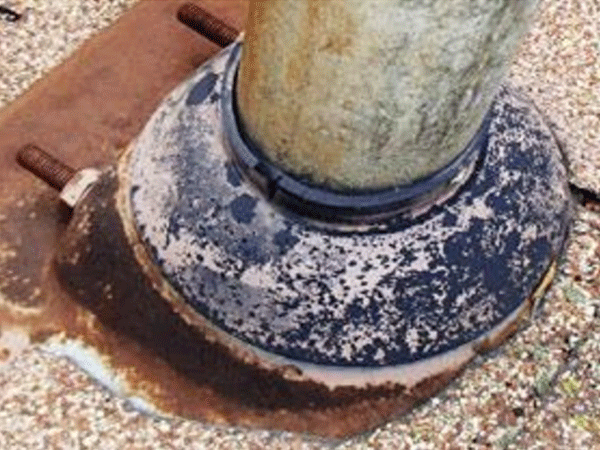
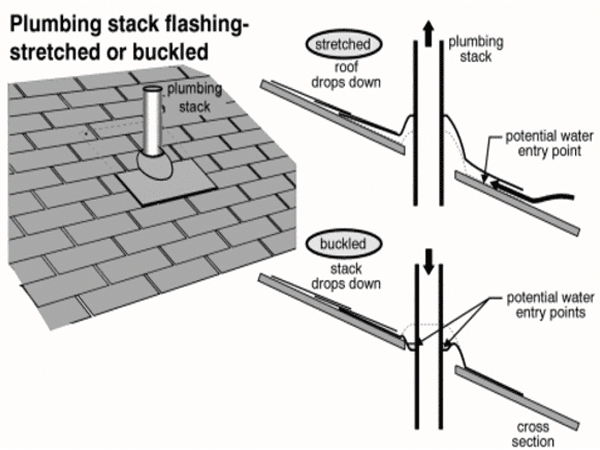
Plumbing Stack Flashing
Plumbing vent flashings are notoriously responsible for roof leaks. If you have a leak in the general area of a plumbing vent, the first step would be to check the condition of the vent flashing. Signs of rust holes or gaps around metal vents (required for cast iron waste lines) can mean that water is penetrating the flashing and seeping into your home. If you have rubber vents (which are used for plastic pipes), it is important check to see if they have become brittle and cracked. At Home Inspections LLC, we can quickly diagnose any problems with faulty plumbing stack flashings and recommend the best course of action.
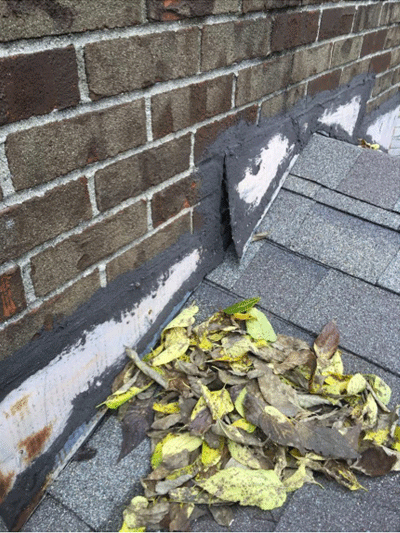
Side Wall Flashing/Step Flashing
Sidewall flashing, which is more commonly known as step flashing is installed in places where the roof intersects with the wall. This intersection should be covered in a L-shaped piece of metal that is a few inches longer than normal shingle overlap. As the shingles are installed, each course is laced into the flashing for a tight fit that forces the water to drain away safely.
Depending on the type of shingles and the region where the roof is being installed, roofers may be required to install continuous flashing. This newer type of flashing became popular in 2012 in order to improve flashing performance. It provides a simple piece of flashing that could be left exposed or covered with shingles for a more aesthetically uniform look.
Either way, it is important that all seams in the roof and intersections are adequately protected with the appropriate type of flashing. These areas of the roof are particularly vulnerable to water exposure and leaks. Improper installation of flashing can result in major problems. It is important to ensure that your roofing expert is well versed in best installation practices.
Bad Flashing Details
You may be surprised to learn just how many roof leaks are the result of improper flashings. That is why you should insist that step flashing is installed along every location of roof-wall details. In some cases, this can involve a “peel & stick” underlayment product that goes under the shingles/flashing and up the wall in addition to the appropriate counter-flashing for brick applications. One piece of step flashing should be used for each shingle course. The step flashing must be nailed to the roof deck, not the wall; whereas the counter-flashing is attached only to the wall, which allows for expansion and contraction of wall relative to roof.
Placing continuous flashing against a sidewall is one common way to install a roof, but it’s not the correct way. While it may seem like installing a single piece of flashing would offer more protection than many pieces of step flashing, the opposite is actually true.
All it takes is a small section of roofing cement to fail in order for a leak to form. Every time it rains, additional water will enter the roof and in no time at all, you have a problem with rotten wood. Step flashing offers superior protection from leaks, because even if a single piece of step flashing fails, the water simply hits the next piece below. Then that piece of flashing directs the water onto the shingle and the water easily drains down the roof. Step flashing essentially comes with a built in back-up system that ensures proper operation and water diversion even if one piece in the system fails.
Ice and Water Shield/Rake edge/Drip edge
Self-adhered roofing underlayment products are designed to protect homes from wind-driven rain and ices dams and are a key component of any roof’s water protection system. In addition, ice and water barriers offer superior watertight laps, which are critically important in keeping the roof dry and safe in places that experience extreme weather. Ice and Water shield is strategically placed around vents, chimneys, skylights and valleys to protect against water intrusion. Anywhere water tends to collect and flow can be kept safe from damage by using an ice and water shield product.
At Home Inspections LLC, we check for ice and water shield because it will prolong the life of your roof. This is why we highly recommend using the Ice & Water Shield system, which allows for easy detailing of leak prone areas of the roof deck, such as eaves, valleys, chimneys and roof to wall transitions. This trusted product would keep water from seeping under your roof and doing damage to your roof, attic and even the interior of your home.
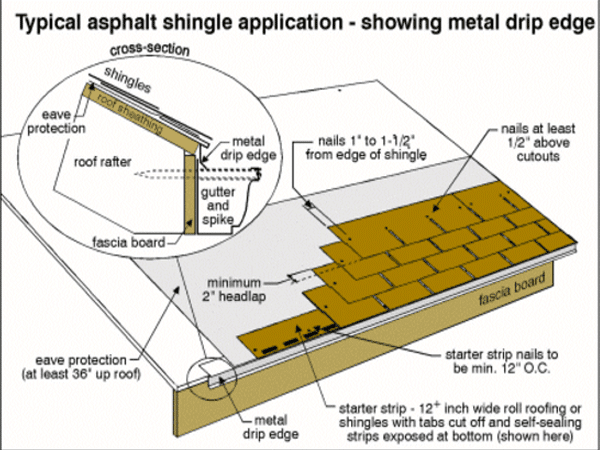
Neglecting to Install Drip Edge
While the drip edge is only technically “required” to be installed on the eaves of a home, we recommend that it also be installed on the rakes. The drip edge, which consists of a small metal trim-piece that is placed right below the edge of the shingles, serves one main purpose:
A drip edge prevents water from dripping behind the gutters and into the roof. The lower edge of a roof should extend beyond the fascia board by about 3/4 inch so that runoff drains into the gutters. If this slight overhang is too short, water will drip behind the gutters, leading to rotted roof sheathing and fascia, stained siding, and even soil erosion and a flooded basement.
You can prevent this problem by installing a sheet-metal drip edge, also called drip cap. A professional can simply slip the wide, flat flange of the material all the way under the first course of roof shingles, as illustrated, making sure that the outer edge extends over the gutter.
Installing Shingles on Low-Slope Roofs
When a roof’s pitch is 2:12 or lower, shingles simply can’t function correctly. Shingles aren’t designed to create a waterproof roof layer. Instead, they are meant to act as a water-shedding roof layer. As long as gravity can keep the water traveling down the roof, shingles can protect your home from water.
However, when the pitch of the roof is too shallow, the water will naturally seep up under the shingles and cause building materials to rot and the roof to leak. If you have a shallow roof, it is important that you work with a knowledgeable home inspector and roofing contractor to install roofing solutions that will both protect your roof from water seepage and help direct water off of the roof.
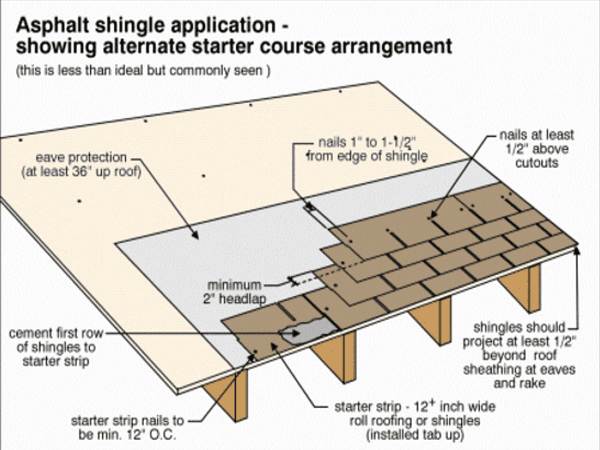
Improper Starter Course
Typically, the roofer will use “upside down” 3-tab shingles to create a starter course for a shingle roof. While this is common practice there is a better approach installing this first row of shingles. At Home Inspections LCC, we recommend beginning with a special pre-manufactured starter strip that creates a tar line about 1″ from the edge of the roof. Any proper starter material should measure about as half as tall as a shingle. Using the correct products to install the first course of shingles can protect the integrity of subsequent rows and the entire roof.
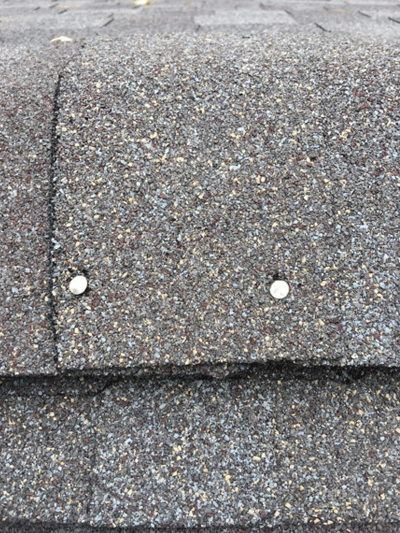
Improper Nailing
Shingles are made of a fiberglass mats. Both the top and bottom are then covered in asphalt. As roofers nail the shingles into place, they need to be careful about driving the nail straight into the shingle. If a nail enters at an angle, it then creates a tear in the fiberglass mat, it ultimately is compromising the entire integrity of the shingle. Any shingle that has been nailed in improperly should be immediately removed.
A reputable roofing installation company will be sure to correct any such mistakes. Another common nailing problem occurs when nails are over-driven into the shingles. This is usually the result of a poorly calibrated compressor’s pressure and can also result in torn shingles that will need to be replaced. Roofers can avoid this problem and eliminate wasted shingles by testing the pressure of their tools before they begin installing your roof.
High nailing is yet another nailing problem that can cause problems down the line. If a roofer places the nail too high on the shingle, the bottom ply of the shingle can become unglued and eventually fall off the roof. As you might imagine, this can lead to leaks.
A highly qualified and dedicated roofing inspector will be on the lookout for any nailing irregularities. These may need to be looked into further to make sure that any damage has not already occurred. In addition, an inspector can identify any shingles that may need to be replaced in order to avoid future problems due to improper nailing.
3-Tab or Dimensional Shingles Used for Hips and Ridges
When it comes to your roofing system, the areas known as the hips and ridges are some of the most vulnerable locations. These areas tend to be subjected to the highest wind speeds, which can literally rip shingles right off your roof.
To protect this area, you should install special hip and ridge shingles that have been designed to resist aggressive winds. Hip and ridge shingles provide added thickness, weight and durability. They are also installed using special fasteners and silicon sealant. The only way to properly inspect these shingles is to climb on the roof and visually examine the area to make sure that installation best practices have been followed.
The professional and highly trained home inspectors at Home Inspections LCC work hard to ensure that Columbus, Ohio area residents enjoy the best in roof inspection processes. We go the extra mile to inspect your roof up close and examine all details of the construction process to make sure that your roof was properly installed and is able properly divert water and protect your home.
Our inspections go beyond simply looking for signs of aging and make sure that your greatest investment is protected. Call us today with your questions and to schedule a roof inspection for your home.
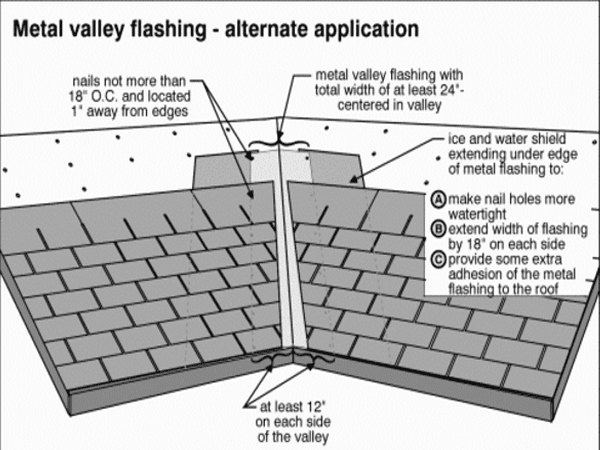
Valley Problems
Shingling a roof valley presents a unique set of challenges. When properly shingled, the roof’s valley should be waterproof and capable of correctly diverting water away from the roof and into the gutters.
While there are a variety of different methods that can be used to shingle valleys, the most important aspect of an installation is that the shingles create an overlaying seal and “cut back” that will prevent water from working its way under the shingles.
Because our roofing inspectors are knowledgeable in construction and roofing best practices, they will know exactly what to look for when it comes to a properly installed roof valley. If there are areas that are vulnerable to leaks, we will be sure to include these findings in our inspection report and make specific recommendations for remedying the problem.
Lack of Crickets Behind Chimneys
A cricket is small gabled-roof or ridged structure that is built behind the high side of a chimney in order to prevent water from accumulating behind the chimney. This small roof detail goes a long way to direct water away from the vulnerable areas around the chimney. For smaller applications, the cricket can be constructed from a piece of metal. Larger chimneys require a larger cricket that is often built using wood and covered with roofing material. While it might have a funny name, the cricket serves an important purpose. If your chimney doesn’t include a cricket, then you will need to make some adjustments to your roof in order to avoid any problems.
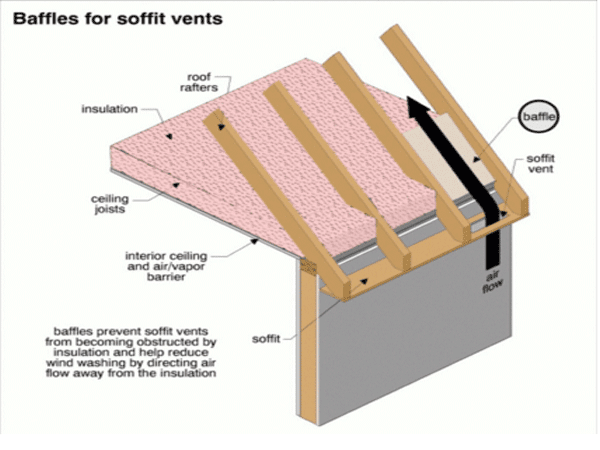
Insufficient or Non-Existent Attic Ventilation
It may come as some surprise that about 90% of homes in the U.S. have inadequately ventilated attics. While this should be a regular part of construction best practices, the attic is often overlooked and treated as a minor detail. The truth is that an unventilated attic can reach temperatures up to 45 degrees warmer than a properly ventilated attic. So why does this matter?
An improperly ventilated attic that reaches hot temperatures also creates the perfect place for moisture to become trapped, and a variety of microbes to build a cozy home. In fact, some studies have found that up to 58% of childhood asthma cases can be tied back to an improperly ventilated attic. Ventilation serves a variety of purposes, including eliminating moisture and protecting the health of your family.
In addition to affecting your health, poor ventilation can also wreak havoc on your wallet. As moisture gets trapped in your attic and reaches high temperatures, it can actually create an oven-like environment that essentially “cooks” your roof decking. Eventually, this process can result in heat blisters on your shingles, which will reduce the lifespan or your roof. Even if you don’t notice the effects of poor ventilation on your health or home, you will see it reflected in high heating and cooling bills. Proper ventilation is the perfect way to reduce energy consumption and monthly expenditures.